Operation
What do you do when your layout is complete or finished? You will find many answers to this question, some of which might be, tear down and start all over again, someone else will say a layout is never finished, there is always detail that can be added, better materials that becomes available etc.
Some serious model railroaders might offer another option, operation! In real life, a train has a purpose for traveling from point A to point B. Part of that purpose may be economic, to make money in the process and help someone else make money by providing transport for materials that they either need as raw materials or to ship the manufactured product. Or, even to move passengers.
So, how do we copy this movement of raw materials and products on our layouts?
One this page, I want to look at ways in which we can simulate prototype operations.
In order to operate a freight train, we need either a source or a destination, or better yet, both. Then we need rail cars that can ship that commodity, and finally we need a train to move the rail cars from point A to point B.
Industries:
Many different industries can be modeled quite easily. There are many fine kits of factories and the like available to the modeler. Then there are also places such as yards and harbours that count as universal industries, meaning any type of freight car can originate or end its journey there.
Knowing all this, how do I go about to operate my layout in a way that is more than just running trains in a circle?
Plan, see a logical flow of things and put it all together. On my layout I have an automaker (car manufacturer) as one of my industries. Now, in order to produce vehicles, it needs certain raw materials, like steel, frames for the cars, it needs oil and fuel for the vehicles once they are built. All of these things are brought in via rail. The manufactured product can also be shipped via rail in special car carriers or autoracks. Where does the supply train originate? On my own layout, there is a harbour and most of the products are brought in by ship and then transported to the automaker via rail. That gives the train a purpose for existing. Once the train arrives at the automaker, the different commodities needs to be placed where they will be unloaded. This brings me to the next topic which is:
Car Forwarding Systems:
Tab on Car system:
There are many different types of car forwarding systems in use, from very simple to complex. There are tab on car system, waybills, computer generated switch lists to name but a few. Most of these systems take some time to set up initially, but once set up, they provide a reliable way of moving rail traffic over your layout.
Let us look at a the "tab on car system". This system works with color coded tabs on the cars. An industry will be assigned a color and all cars in the train with that specific color tab on them must be delivered to that industry. Once, the rail cars has been delivered, the tabs are removed and replaced with different color ones so the car can be moved to the next destination.
Waybills:
With waybills, there are a lot of paperwork. There is a car card that contains a description (the type of car), its number and also road name. On top of this, there can be a second card or piece of paper with the lading of the car and its destination. When a train is made up in a yard, all the cards must accompany the train to their various destinations. The car card is delivered along with the car. Some model railways have special pockets for car cards. These pockets are sometimes labelled for the specific industries, other times it is labelled inbound; outbound and delivered. It all depends on the method the owner of the layout uses. On one of my previous layouts, each station had 4 card pockets, labelled as follows: Outbound west, Outbound east, Delivered and inbound. Once a train drops cars at the station, the cards for those cars are placed in the "inbound" holder. Then the person running the switcher or local train will pick those cars up and place them at the correct destinations, as well as move the car cards from the inbound to the delivered pocket. Any cars that has been loaded are then moved to a ready track and the card placed in the Outbound pocket corresponding with the direction of the cars next destination. The waybill on the car card is then also changed, sometimes there are 4 waybills on a single piece of paper, secured to the car card with a paperclip. The waybill is then first rotated 180 degrees to get to the next destination for that car, and then the waybill is flipped over for a third destination and finally rotated again for a 4th destination. (there are commercial systems like this available to the hobbyist) With the home computer being so common, it is also quite easy to design and print your own.
Simplified systems:
One article I read had a real simple solution to moving cars over the layout. At every stop, there was simply a number. This number told the engineer how many cars to switch, but there was also one or two simple rules to go with that system. If 5 cars were delivered at a station/town, 5 cars had to be picked up. The engineer also had to know which car types matched with which industries. If an engineer was lazy, he did not have to do any switching and no one would know, as the train would still be the same length.
On my own layout I use a system that does not make use of car cards or tabs on the cars. I did not develop this system, I adapted it for use with my model railway. How does it work if there are no cards? Well, it requires some knowledge from your operating crew, but just the ability to read is all that is needed to implement this system. It works on the principle that certain producers require certain types of cars for shipping their commodities. So, each industry has a list of possible car types that can be delivered to it. For instance I have a grain silo on my layout. The most obvious would be that there will be grain cars going to the grain silo. The silo also needs some fuel for heating the grain dryers, so a tank car may also find its way to the grain silo. Each town has a few industries that receives at least two different types of cars. My favourite is the automaker, which can receive and dispatch 6 different types of car.
A printed list will tell the operator that at this station, his train needs to deliver 2 boxcars to that factory, and pick up an empty tank car from another factory. A train 's instruction list will give relevant information per town, like which type of car is to be delivered or picked up from which industry and where the next stop will be. On my layout, which is still under construction, there are three locations in use. Aloes, the one with the automaker and cement plant, Waterkloof with the main yard and loco servicing facility and East London, a branchline leading to a harbour.
Thus an instruction list for the car train will look something like to following:
Pick up car train at Aloes. Depart to Waterkloof, run through platform 1. Request track clearance from dispatcher to proceed to East London, track 1. Once, in East London track 1, slowly back the train into the loading track, uncouple the locomotive and return to Waterkloof locomotive depot.
That is the instructions for 1 train only. Before you know it, quite a bit of time has passed. On a previous layout of mine, I had a regular operating crew of 4-6 members, and we ran only 8 trains on a layout with 3 stations and sometimes it took us up to thee hours to run those 8 trains. On that specific layout, I used a waybill system with a car card and the destinations printed on the card. A paperclip was moved over the destination where that car was headed to next.
Making things complicated again: (but it helps to add realism)
When developing your train list for your layout, there are a few things to consider, which the prototype also has to do. How frequently must an industry receive and ship cars? Some industries like a coal fired power station will need a coal train at least once a day. A mine producing coal can send off a couple of trains per day. So, how do we determine how many times we need to switch an industry? A few factors come into play. 1. How big is the industry, how much does it produce? How many cars will it fill in a single shift? Some industries like a furniture factory may take a couple of days to fill a boxcar, while others may fill it in a couple of hours. So, keep that fact in mind. The second question is how many cars can be stored on the spur/siding servicing that industry? If we have an industry that produces 3 box cars worth of product in one shift and has only room for 1 boxcar on the spur track, then it will have to be switched 3 times during a shift. On the other hand, if our furniture factory takes 2 days to fill a boxcar and has a spur track that can hold 3 cars, it needs to be switched once in 6 days only.
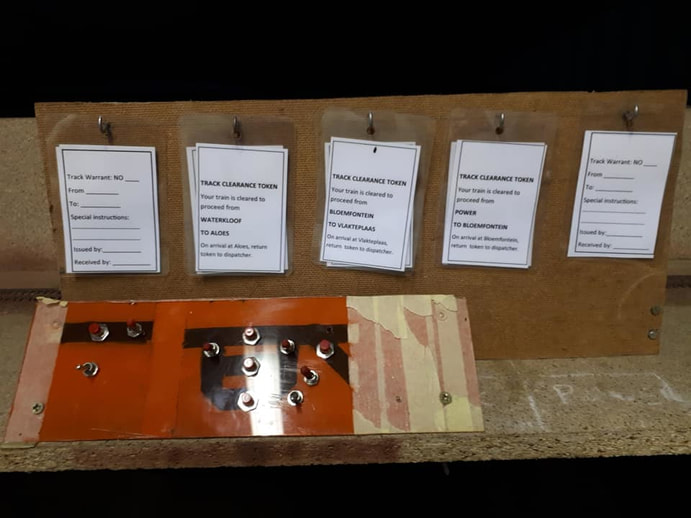
Dispatchers panel and track clearance cards
|
Fast Clock
Because our models are much smaller than the real thing, it does not take the same amount of time to travel from one station or yard to the next as on the real railroad. So, how do we overcome this problem? We scale time down, using a fast clock. This means that the clock runs 1 hour in 5 minutes or 10 minutes. ( I downloaded a fast clock app on my cellphone. This app can also be linked to slave displays on other cellphones using bluetooth. Even the ratio of scaling down can be set, from 1 :2 to 1 : 16) 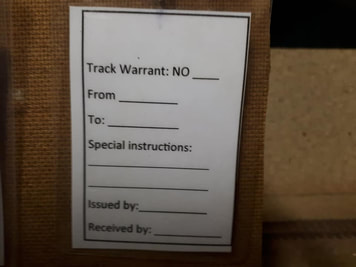
Track Warrant card
Controlling train movements over the layout
In order not to have two trains compete for the same piece of track, there has to be some way of controlling the train movements. In real life, it is a mixture of signals, track warrants, tablets and radio communication. The prototype I am modeling used all of these methods and more. Signals are normally used in conjunction with another method or giving a train permission to be in a section of track. On my layout, there are different types of signals. Block signals govern sections of the mainline. The block signals work automatically using a light sensor to determine if a train is in that block. If there is a train in that block, it turns the signals at either end of that block red, till the block is cleared at which point they will return to green. |
Compiling a list of trains
Once you have made your car cards and way bills, or your colour coded tabs, you need to determine your trains. This means you have to make a list of the trains that will run during an operating session. Sometimes, it might even be worth while to run only half the trains in one session and the next half in the following session, this will prevent things from becoming monotonous. Once you have made the list of trains, including from where to where they run, you need a way to order them over the layout. One of the ways used is a timetable, where trains are run at specific times. So a train might leave from one station or yard and be scheduled to arrive at another at a specific time. Another method is to simply have a list of trains in the order that they need to run, so when one train finishes its run, the next train can depart. Having a list of trains can also be helpful when there are more than one engineer or crew. Then the crew can sign on for a specific train or job. Someone might like to run mainline trains with little or no switching required, whereas someone else who enjoy switching will enjoy the yard job of making up trains. Distant Signals controls the approach to a station and a Home Signal controls the entrance into a station and may also have a route indicator, showing which track is aligned for the the train. 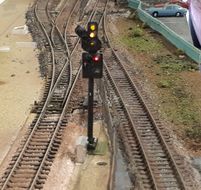
Home signal with route indication
|
Token/ tablet System
This system requires the driver of a train to have a tablet or token giving him permission to be in that specific block of track. The tokens can be a disk, stick, key or even a ball. On my model railway, it is simply a laminated card with the names of the two stations between where the train are permitted to be. (See photo above)
Track Warrant
A track warrant is a little more complicated than the token system, as it is used when there are conditions like meets with other trains. A track warrant will be numbered and date and time stamped. It will instruct the train to proceed to a specific point on the track and wait there to meet a train travelling in the opposite direction, or crossing the main line at a diamond crossing (as is the case on my layout) The branch line to the East London Harbour crosses over passenger platform 2's track and uses a bit of the mainline leading into platform 1. Thus for movement from Waterkloof yard to East London, a track warrant is required if there are other trains operating on the layout that might cross or use the same track. A track warrant will tell the engineer to proceed to a specific point and then wait till the other train has crossed. If the train on the branchline got permission first, it would have gotten a track clearance token, and the train on the mainline would then receive a track warrant, informing it to stop for the train on the branchline.
To experience an operating session watch the youtude videos in the following links:
Control Systems:
In general, there are two types of control, analogue or Digital. There are marked differences between the two. Let us first look at an analogue system. It controls the locomotive by changing the voltage on the tracks for speed and by changing the polarity for direction.
So all locomotives put on the track will run in the same direction (in theory) and if you pick up a locomotive, turn it around 180 degrees, it will still run in the same direction as before, from left to right on the track, The drawback with this system is in order to control many trains, the whole layout has to be divided into electrical blocks, each with its own on/off switch and connection to the power supply and speed controller. For many years this was the only way to do things.
Enter the Digital age,
During the 1980's a few companies started exploring the possibility of more realistic train control, controlling two locomotive on the same track, independently from each other. So, the Digital era came to model railways. Let us look at a basic digital system.
It will have a power supply, command station and controller. The main difference here is that there is a constant voltage on the tracks, and each locomotive has to be equipped with a decoder to work with the system. The command station encodes the commands from the controller, sends it as a digital signal to the track where the locomotive decoder reads the digital signal, decodes it, and if it is addressed to that locomotive, responds to the signal. This has made it possible to turn the locomotive lights on and off remotely and also to add sound to the locomotives. The sound effects are also controlled by the (handheld) controller.
Further advances has been to free the handheld controller from its cable and make it a portable device so that you can walk with your train, specially on large operation orientated layouts. Just about all the DCC (digital command control) manufacturers offer some sort of wireless control option. Some has gone a different route which makes use of a smartphone and wifi connection. You simply download the manufacturer's app to your smartphone, set it up and connect to the wifi network the DCC command station is connected to.
Yet another advance in the world of digital model train control has been the so called "dead rail" Here the locomotive carries a battery pack to supply power and control is by either radio or bluetooth throttles. This is currently popular in the larger scales, but it is trickling down to HO/OO scale as well as battery technology advances.
With a layout designed for operation, it is preferable to have a digital system, that two or more operators can control trains independently from each other, sometimes even on the same track. One person could be running a mainline train, while another is shunting/switching the yard and yet another operator is taking locomotives to the loco servicing facility.
No matter which control system you use, there is a general rule here, one person can only control one train at a time.
